
The Best Chocolate Chip Cookies for Nostalgic Chewy Bliss Recipe is a warm embrace of sweet memories and comfort in every bite. These cookies capture that perfect balance of soft chewiness and gooey chocolate pockets, reminding you of childhood afternoons and cozy kitchen moments. With classic ingredients and an easy method, this recipe transforms simple pantry staples into something truly magical. Whether you’re baking for family, friends, or just to treat yourself, these cookies deliver that nostalgic joy every time.
Ingredients You’ll Need
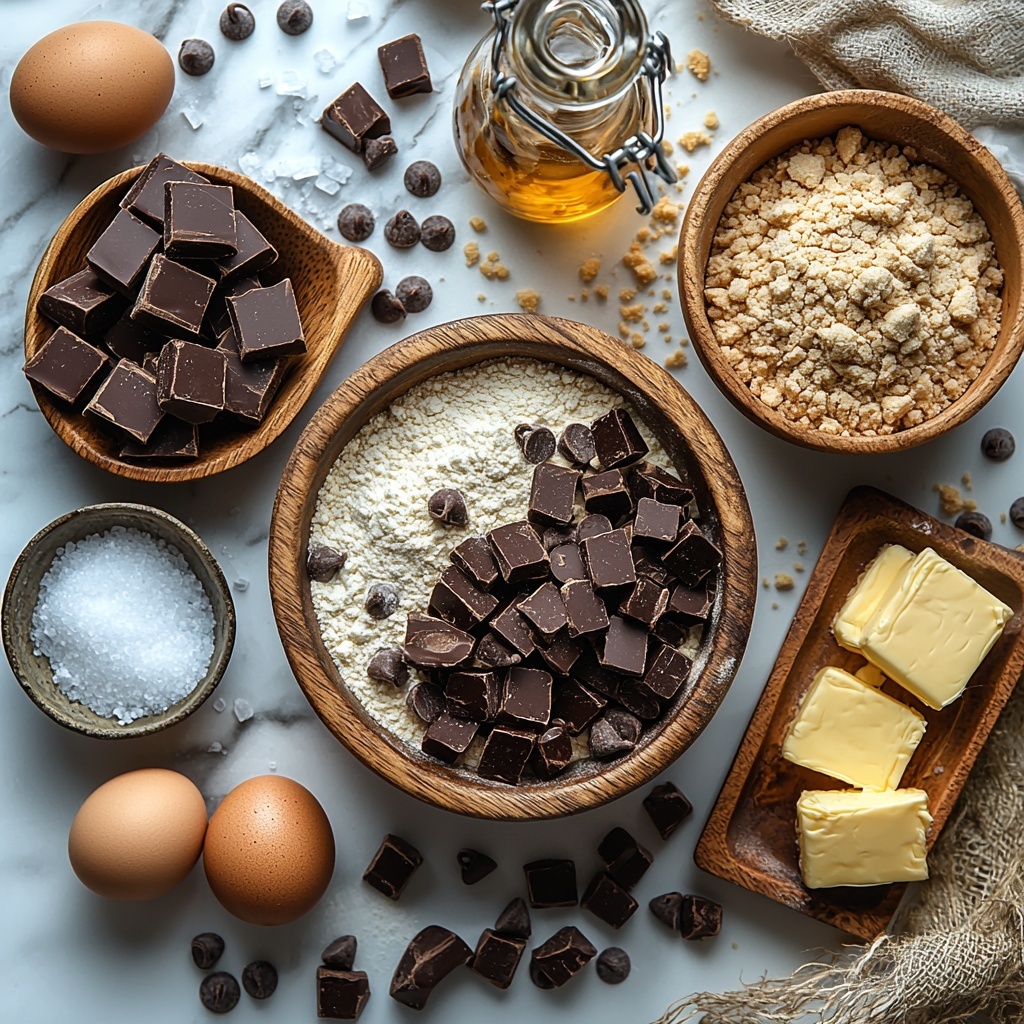
Before diving in, gather these straightforward but essential ingredients, each contributing its unique magic to the perfect cookie texture, flavor, and appearance.
- 2 cups all-purpose flour: The foundation for your cookies’ tender yet sturdy body, perfect for that chewy texture.
- 1 teaspoon baking soda: Acts as a natural leavening agent, ensuring your cookies rise just enough for a soft bite.
- ½ teaspoon salt: Enhances all the sweetness and brings balance to the flavor, and sea salt can add a delicate crunch.
- ¾ cup unsalted butter: Provides richness and tenderness; use margarine or coconut oil for dairy-free options.
- ¾ cup brown sugar: Adds moistness and deep caramel notes that make these cookies irresistibly chewy.
- ½ cup granulated sugar: Brings a clean sweetness and helps achieve those golden edges everyone loves.
- 1 teaspoon vanilla extract: The secret depth that rounds out the cookie’s flavor—pure vanilla is a must.
- 1 large egg: Helps bind the ingredients and adds moisture; a flax egg can work if you prefer plant-based.
- 1 large egg yolk: Contributes extra chewiness and richness; can be omitted for a lighter cookie.
- 1 to 1½ cups chocolate chips: The crowning glory of these cookies—semi-sweet or dark chocolates create melty, indulgent pockets.
How to Make Best Chocolate Chip Cookies for Nostalgic Chewy Bliss Recipe
Step 1: Prepare Your Oven and Baking Sheet
First, preheat your oven to 350°F (175°C) and line a baking sheet with parchment paper. This simple prep ensures even baking and easy cleanup, laying the groundwork for perfect cookies.
Step 2: Mix Dry Ingredients
In a medium bowl, whisk together the flour, baking soda, and salt. This step is crucial for distributing the rising agent and seasoning evenly throughout your cookie dough, which affects texture and flavor.
Step 3: Cream the Butter and Sugars
In a large mixing bowl, melt the butter, then mix it with brown sugar and granulated sugar until the mixture is smooth and creamy. This creates the tender crumb that makes these cookies so satisfyingly chewy.
Step 4: Add the Vanilla and Eggs
Stir in the vanilla extract, egg, and egg yolk until the batter appears glossy and well combined. These ingredients bring moisture, richness, and that unmistakable warm flavor.
Step 5: Combine Dry and Wet Ingredients
Gradually add the flour mixture to your wet ingredients, stirring just until combined. Avoid overmixing here to keep your cookies soft and tender rather than tough.
Step 6: Fold in the Chocolate Chips
Gently fold in the chocolate chips to ensure each bite is studded with melty sweet gems. You can customize this step by choosing your favorite type of chips or chunks.
Step 7: Shape and Bake
Drop rounded tablespoons of dough onto your prepared baking sheet, spacing them about 2 inches apart so they have room to spread. Bake for 10–12 minutes, watching for edges turning golden while the centers remain slightly underbaked—that’s the hallmark of chewy goodness.
Step 8: Cool and Enjoy
Once baked, allow the cookies to cool on the baking sheet for about 5 minutes before transferring to a wire rack. This resting period lets them set properly while keeping that soft, chewy texture intact.
How to Serve Best Chocolate Chip Cookies for Nostalgic Chewy Bliss Recipe
Garnishes
While these cookies are glorious on their own, a sprinkle of flaky sea salt or a light dusting of powdered sugar can elevate their flavor. Adding a few extra chocolate chips on top before baking also adds a lovely visual and taste boost.
Side Dishes
Pair your cookies with a cold glass of milk for a timeless combination, or warm up the moment with a scoop of vanilla ice cream for a decadent dessert experience. For coffee lovers, these cookies beautifully complement a creamy latte or bold espresso.
Creative Ways to Present
Turn your batch into a charming gift by stacking cookies in a decorative tin or wrapping them in parchment paper tied with twine. You can also sandwich two cookies around a scoop of ice cream for a homemade cookie ice cream sandwich that will impress anyone lucky enough to try one.
Make Ahead and Storage
Storing Leftovers
To keep your cookies fresh, store them in an airtight container at room temperature. They stay soft and chewy for up to a week, making them perfect for quick treats or spontaneous guests.
Freezing
If you want to enjoy these nostalgic chewy cookies later, freeze the dough rolled into balls or the baked cookies themselves. Dough balls can be frozen for up to three months and baked fresh whenever a cookie craving strikes.
Reheating
Warm leftover cookies in the microwave for 10 to 15 seconds or pop them in the oven at a low temperature for a few minutes. This revives their soft, gooey character as if they were just baked.
FAQs
Can I make these cookies gluten-free?
Absolutely! Substitute all-purpose flour with a gluten-free flour blend to keep the texture just as chewy and delightful without compromising flavor.
Is there a dairy-free alternative for butter?
Yes, margarine or coconut oil works perfectly as a substitute for unsalted butter, providing similar moisture and richness in the cookies.
Can I add nuts or other mix-ins?
Definitely! Chopped walnuts, pecans, or dried fruit can be folded into the dough along with the chocolate chips to customize your cookies even more.
How can I make the cookies more cakey than chewy?
Try reducing the brown sugar slightly and adding a bit more flour or an extra egg white. This adjusts the texture to a lighter, cakier bite but won’t lose the nostalgic charm.
Why do my cookies spread too much?
This usually happens if the butter is too warm or you don’t chill the dough. Make sure your butter is just melted but cooled slightly, and consider chilling the dough for 30 minutes before baking for better cookie shape.
Final Thoughts
There’s something truly special about the Best Chocolate Chip Cookies for Nostalgic Chewy Bliss Recipe that brings people together and sparks smiles. Baking these cookies is more than just following a recipe—it’s creating a little moment of joy and warmth. I encourage you to try this recipe and let the comforting aroma and perfect chewy texture remind you of your fondest memories. Happy baking!
Print
Best Chocolate Chip Cookies for Nostalgic Chewy Bliss Recipe
- Prep Time: 10 minutes
- Cook Time: 12 minutes
- Total Time: 22 minutes
- Yield: 24 servings
- Category: Dessert
- Method: Baking
- Cuisine: American
Description
These Best Chocolate Chip Cookies deliver nostalgic chewy bliss with a perfect balance of crispy edges and soft centers. Made with simple ingredients and baked to golden perfection, these classic treats are sure to satisfy your sweet tooth and evoke fond memories.
Ingredients
Dry Ingredients
- 2 cups all-purpose flour (substitute with gluten-free flour blend if needed)
- 1 teaspoon baking soda (fresh baking soda recommended)
- ½ teaspoon salt (try sea salt for an added touch)
Wet Ingredients
- ¾ cup unsalted butter (substitute with margarine or coconut oil for dairy-free)
- ¾ cup brown sugar (coconut sugar can be a substitute)
- ½ cup granulated sugar (honey or maple syrup can be alternative sweeteners)
- 1 teaspoon vanilla extract (pure vanilla recommended)
- 1 large egg (for an egg alternative, opt for a flax egg)
- 1 large egg yolk (can omit for a lighter cookie)
Add-ins
- 1 to 1½ cups chocolate chips (semi-sweet or dark) (can swap with white chocolate or butterscotch)
Instructions
- Preheat Oven: Preheat your oven to 350°F (175°C) and line a baking sheet with parchment paper to prevent sticking and ensure even baking.
- Mix Dry Ingredients: In a medium bowl, whisk together the flour, baking soda, and salt; set aside to combine evenly.
- Cream Butter and Sugars: In a large mixing bowl, melt the butter and stir it with brown sugar and granulated sugar until the mixture is smooth and creamy, creating a rich base for your cookie dough.
- Add Vanilla and Eggs: Stir in the vanilla extract, one whole egg, and one egg yolk until the mixture is glossy and fully combined, ensuring moisture and flavor.
- Combine with Dry Ingredients: Gradually fold the flour mixture into the wet ingredients, stirring gently until just combined to avoid overmixing, which keeps cookies tender.
- Incorporate Chocolate Chips: Fold in the chocolate chips evenly throughout the dough for pockets of melty chocolate in every bite.
- Form Cookies: Drop rounded tablespoons of dough onto the prepared baking sheet, spacing them about 2 inches apart to allow for spreading.
- Bake: Bake in the preheated oven for 10-12 minutes, looking for golden edges and slightly underbaked centers to achieve chewy texture.
- Cool: Allow the cookies to cool on the baking sheet for approximately 5 minutes before transferring them to a wire rack to cool completely, setting their shape and texture.
Notes
- For gluten-free options, substitute all-purpose flour with a gluten-free flour blend.
- Use fresh baking soda to ensure proper rising and texture.
- Butter can be replaced with margarine or coconut oil for dairy-free alternatives.
- Brown sugar can be substituted with coconut sugar, and granulated sugar with honey or maple syrup, but adjustments may affect texture.
- For an egg-free version, use flax eggs as a substitute.
- Chocolate chips can be varied based on preference—try white chocolate or butterscotch for different flavor profiles.
- Ensure not to overmix the dough once flour is added to keep cookies tender.
- Cookies continue to bake slightly on the sheet after removal from oven, so pulling them out with slightly underbaked centers results in the best chewiness.


