
If you’re looking to wow your guests this spooky season, nothing quite captures the eerie delight of Halloween like the Halloween Cherry Skull Pie Recipe. This show-stopper combines a luscious, thick cherry filling with a buttery, flaky crust that’s crafted right into a hauntingly beautiful skull design. Perfectly balancing sweet and tart flavors, and finished with warming cinnamon notes, this pie is as delicious as it is eye-catching. Whether you’re hosting a Halloween party or simply craving a festive treat, this Halloween Cherry Skull Pie Recipe is sure to become your seasonal obsession.
Ingredients You’ll Need
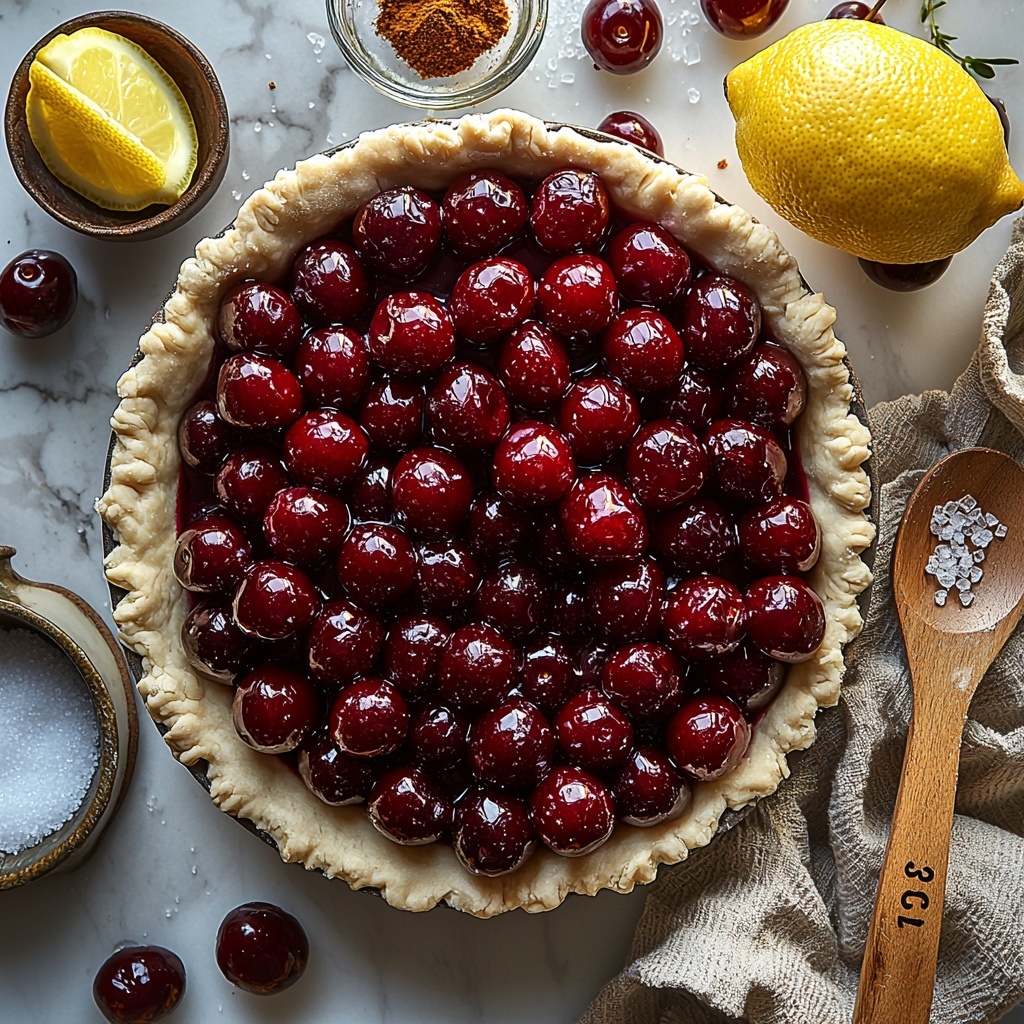
Gathering simple yet essential ingredients is key to creating the perfect texture and vibrant flavor in this pie. Each item plays its part, from the juicy cherries bringing that signature burst of color and sweetness to the cinnamon adding a warm, spicy hint that elevates every bite.
- 32 ounce frozen dark cherries (pitted): These juicy cherries provide the rich, deep flavor and gorgeous red hue that are the star of the show.
- 1 cup granulated sugar: Sweetens the cherries just right, balancing the natural tartness.
- 1/3 cup cornstarch: The secret to a perfectly thickened cherry filling that won’t leak when sliced.
- 1 squeeze fresh lemon juice: Adds brightness and a little tang to lift the cherry flavor.
- 1 teaspoon ground cinnamon: Brings a subtle warmth that complements the fruit beautifully.
- 1 teaspoon sea salt (finely ground): Enhances all the flavors and keeps the sweetness in check.
- Refrigerated pie dough (2 sheets): Convenient and buttery, providing the perfect flaky crust for the spooky skull design.
How to Make Halloween Cherry Skull Pie Recipe
Step 1: Preheat the Oven and Prepare Cherry Filling
Start off by heating your oven to 400 degrees F to get things ready for baking. While it warms, combine your cherries, sugar, cornstarch, cinnamon, salt, and lemon juice in a large saucepan. Stir well to fully coat the cherries before heating over medium heat. Keep stirring frequently to prevent sticking as the mixture starts to thaw and thicken—this step ensures your filling is luscious and perfectly thickened.
Step 2: Cool and Prepare the Pie Crust
Once your cherry filling has thickened beautifully, set it aside to cool slightly. Meanwhile, roll out one sheet of refrigerated pie dough into a 10-inch circle, then carefully transfer it to your 8-inch pie dish. Don’t worry if there’s some overhang; that’s normal and will come in handy when sealing the top crust later.
Step 3: Assemble the Filling and Design the Skull
Pour the slightly cooled cherry filling evenly into the pie shell, making sure it’s nicely spread out. Next, roll out the second pie dough sheet into another 10-inch circle. Here comes the fun part: cut out two eyes (holes), two slits for the skull nose, and a crooked smile. This whimsical design is what transforms this dessert into a Halloween classic.
Step 4: Seal and Decorate the Pie
Gently lay the skull-crust over your filled pie, centering the spooky face. Press the edges lightly to seal the top and bottom crusts together, then use a fork to crimp the edges firmly. For a gorgeous shiny finish and extra crunch, brush the pie with an egg wash made from one beaten egg mixed with a tablespoon of milk, then sprinkle with Demerara sugar for a sparkling, subtle sweetness.
Step 5: Bake to Golden Perfection
Place your pie on the middle rack of the oven and bake for 45 to 50 minutes. Keep an eye on it as your kitchen fills with that irresistible aroma. The crust should turn a gorgeous golden brown, signaling that your Halloween Cherry Skull Pie Recipe is ready to amaze and delight all who see and taste it.
How to Serve Halloween Cherry Skull Pie Recipe
Garnishes
Enhance the spooky appeal by serving slices with a dollop of fresh whipped cream or a scoop of vanilla ice cream. A sprinkle of powdered sugar or a few fresh cherries on the side adds extra charm and a pop of color.
Side Dishes
This pie pairs wonderfully with a cup of warm spiced cider or a rich hot chocolate, creating a cozy and festive atmosphere perfect for Halloween gatherings or cozy nights in.
Creative Ways to Present
For a fun twist, serve the pie on a black or skull-themed platter to really lean into the Halloween vibes. You could also add a drizzle of dark chocolate sauce around the plate to make each slice look even more indulgent and spooky.
Make Ahead and Storage
Storing Leftovers
Keep any leftover pie covered in the refrigerator, ideally wrapped tightly with plastic wrap or stored in an airtight container. This will keep the crust crisp and the cherry filling fresh for up to 3 days.
Freezing
If you want to save the pie for later, wrap it securely in plastic wrap and then aluminum foil before placing it in the freezer. It will keep well for up to 2 months. When ready to enjoy, thaw overnight in the refrigerator.
Reheating
Warm your leftover pie in a preheated 350 degrees F oven for about 15 to 20 minutes to revive that flaky crust and delicious filling. Avoid microwaving if you can, as it tends to make the crust soggy.
FAQs
Can I use fresh cherries instead of frozen?
Absolutely! Just make sure to pit them first. Fresh cherries might release a bit more juice, so you may want to adjust the cornstarch slightly to ensure your filling thickens properly.
What if I don’t have refrigerated pie dough?
You can make your own pie crust from scratch or use a frozen dough that you thaw. The key is to work with cold dough for the flakiest results, so chilling it before rolling is essential.
Can I make the skull design in advance?
Yes! Prepare and cut out the skull design ahead of time and keep it refrigerated until ready to assemble. This helps save time on the day you bake the pie.
Is there a way to make the filling less sweet?
Definitely. You can reduce the granulated sugar by a quarter cup or add a little extra lemon juice to increase the tartness for a more balanced flavor.
How do I prevent the crust edges from burning?
If you notice the edges browning too quickly, use a pie crust shield or loosely cover the edges with foil halfway through baking. This protects the crust while the filling finishes cooking.
Final Thoughts
I can’t recommend enough giving the Halloween Cherry Skull Pie Recipe a try this season. It’s a show-stopping centerpiece that’s as fun to make as it is to eat, guaranteed to impress friends and family alike. Dive in, get creative with that spooky crust design, and enjoy every delightful bite of this festive treat!
Print
Halloween Cherry Skull Pie Recipe
- Prep Time: 20 minutes
- Cook Time: 50 minutes
- Total Time: 1 hour 10 minutes
- Yield: 8 servings
- Category: Dessert
- Method: Baking
- Cuisine: American
Description
This spooky Halloween Pie features a sweet and tangy cherry filling encased in a flaky double crust with a fun skull face cutout on top. Perfect for festive fall celebrations, this cherry pie combines the warmth of cinnamon with the brightness of lemon juice for a deliciously eerie dessert.
Ingredients
Filling
- 32 ounces frozen dark cherries (pitted)
- 1 cup granulated sugar
- 1/3 cup cornstarch
- 1 teaspoon ground cinnamon
- 1 teaspoon finely ground sea salt
- 1 squeeze fresh lemon juice (about 1 tablespoon)
Crust
- 2 sheets refrigerated pie dough
Topping
- 1 egg
- 1 tablespoon milk
- Demarara sugar, for sprinkling
Instructions
- Preheat Oven: Set your oven to 400°F (204°C) and let it fully preheat while you prepare the filling and pie.
- Make the Cherry Filling: In a large saucepan, combine the frozen pitted cherries, granulated sugar, cornstarch, ground cinnamon, sea salt, and fresh lemon juice. Stir the ingredients to fully coat the cherries. Cook over medium heat, stirring frequently, until the cherries thaw and the mixture thickens, making sure it doesn’t stick to the pan.
- Cool Filling: Once thickened, remove the pan from heat and set the cherry filling aside to cool slightly, allowing the flavors to meld.
- Prepare Bottom Crust: Roll out one sheet of refrigerated pie dough into a 10-inch circle. Carefully transfer it into an 8-inch pie dish, letting any overhang remain; this will help seal the top crust later.
- Fill the Pie: Pour the cooled cherry filling evenly into the bottom crust-lined pie dish, spreading it out smooth.
- Design Top Crust: Roll out the second pie dough sheet to a 10-inch circle. Using a knife or cutters, cut out two holes for eyes, two slits for the nose, and a crooked smiling mouth to create a fun skull face.
- Place Top Crust: Gently position the cutout dough over the cherry filling, centering the skull face. Press the edges of the top crust against the bottom crust to seal slightly.
- Seal and Glaze Edges: Use a fork to firmly seal the edges all around. Beat together one egg and one tablespoon of milk to make an egg wash. Brush this mixture over the top crust to create a beautiful golden finish once baked, then sprinkle Demerara sugar over the top for added texture and sweetness.
- Bake: Place the pie on the middle rack of the oven and bake for 45 to 50 minutes, or until the crust turns golden brown and the filling is bubbly. Remove from oven and allow the pie to cool before serving.
Notes
- Ensure the cherry filling is not too hot before adding the top crust to avoid making the dough soggy.
- Using Demerara sugar adds a lovely crunch and subtle molasses flavor.
- You can substitute fresh cherries if in season; reduce cornstarch slightly as fresh cherries have more juice.
- For a vegan option, substitute the egg wash with a plant milk and maple syrup mixture.
- Chilling the pie dough sheets prior to rolling helps with easier handling and better crust texture.


