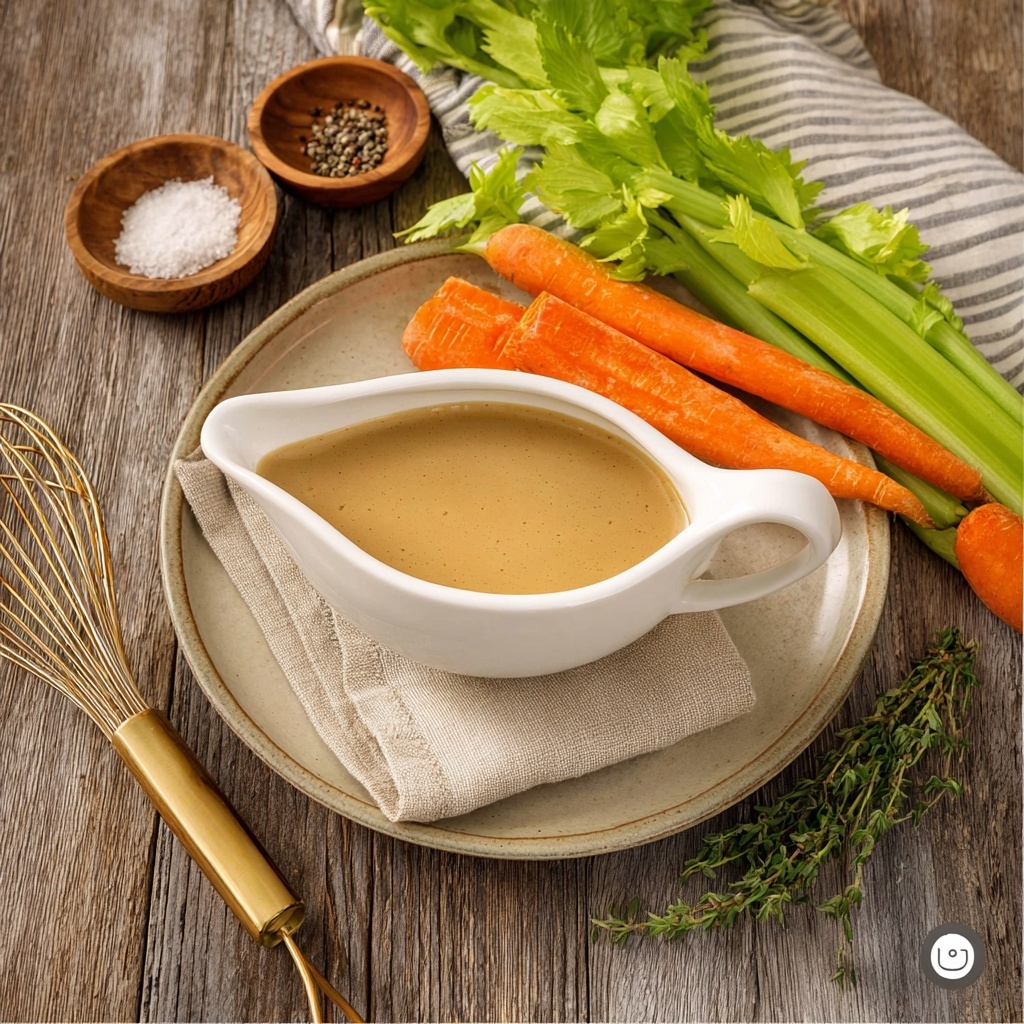
There is something truly magical about the rich, savory goodness of homemade gravy that elevates any holiday feast, and this Make-Ahead Turkey Gravy Recipe brings that delicious magic right into your kitchen with ease. Imagine having your turkey gravy perfectly prepared ahead of time, bursting with deep-roasted flavors from turkey wings and a medley of fresh vegetables, ready to warm and drizzle over your favorite dishes. This recipe lets you savor every moment of your celebration without the stress of last-minute cooking, guaranteeing a silky, flavorful gravy that will have everyone asking for seconds.
Ingredients You’ll Need
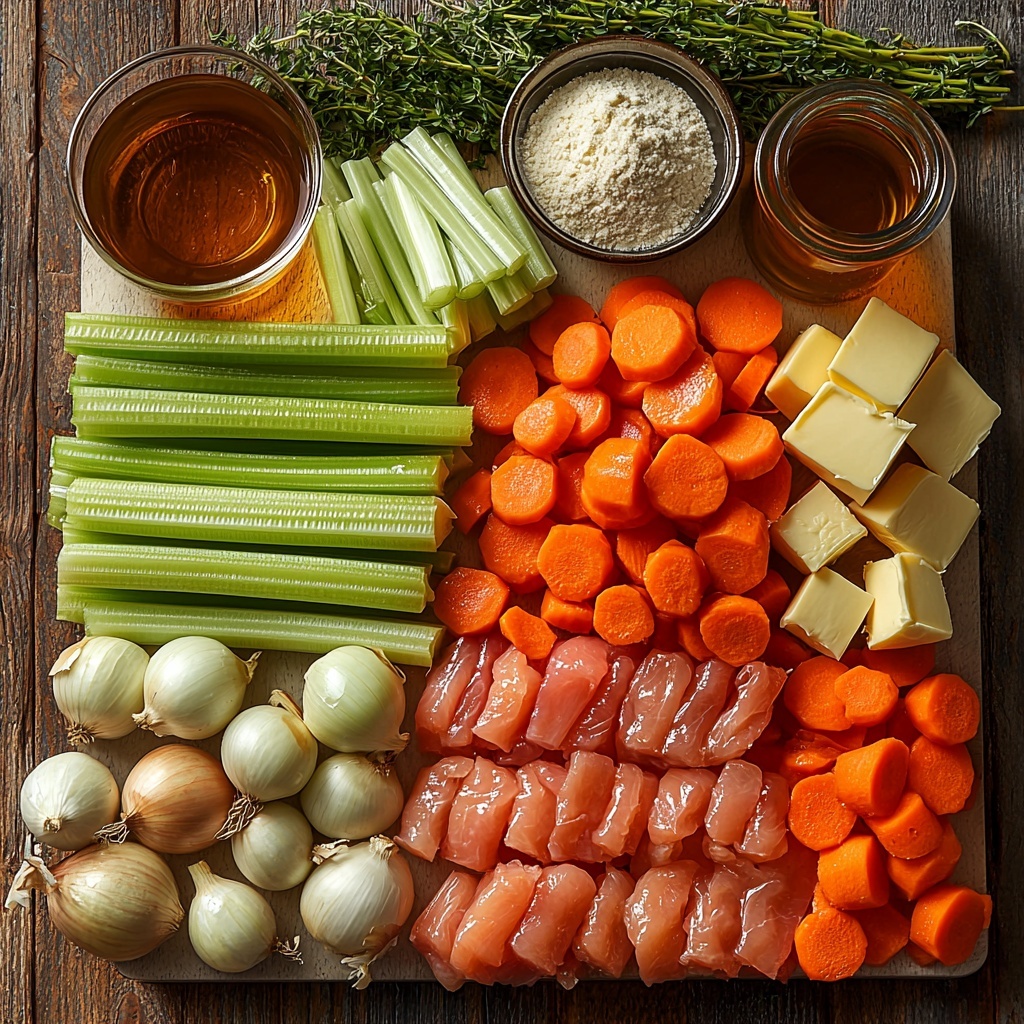
Simple, wholesome ingredients come together in this recipe to create a luscious, velvety gravy. Each component adds its own layer of flavor and richness, turning everyday pantry staples into a spectacular sauce full of character and warmth.
- ⅓ cup olive oil (divided): Provides a subtle fruity base for roasting and enhances the depth of flavor.
- 3 onions, quartered: Their natural sweetness deepens as they roast, building a rich foundation.
- 6 stalks celery, chopped in 2″ chunks: Adds an aromatic earthiness and balances the flavors.
- 4-5 carrots, chopped in 2″ chunks: Introduces a hint of natural sweetness and vibrant color.
- 1 bunch fresh thyme: Infuses the gravy with fragrant, herbal notes for complexity.
- 2 pounds turkey wings: The heart of the recipe, roasting these release intense turkey flavor and richness.
- ¾ cup white wine: Used to deglaze the roasting pan and add acidity that brightens the sauce.
- 8 cups chicken broth: The liquid base that brings everything together, creating body and texture.
- 8 tablespoons butter: Adds silkiness and depth, helping the gravy finish with a luscious mouthfeel.
- ½ cup flour: Essential for thickening the gravy to that perfect consistency.
How to Make Make-Ahead Turkey Gravy Recipe
Step 1: Preheat and Prepare
Start by preheating your oven to 400°F. This high temperature will help you get a beautiful golden roast on the turkey wings and veggies. It’s the roasting that builds the deep, savory backbone of flavor the gravy is known for.
Step 2: Arrange and Season
Drizzle 2 tablespoons of olive oil into the bottom of your roasting pan, to keep everything from sticking and to help with caramelization. Scatter the onions, celery, carrots, and fresh thyme evenly, then lay the turkey wings on top. Don’t forget to season generously with salt and pepper, which brings everything to life. Finish by drizzling the remaining olive oil over the turkey wings to lock in moisture and crisping power.
Step 3: Roast to Perfection
Roast the turkey wings alongside the vegetables for 45 minutes to an hour or until the wings develop a gorgeous golden brown color. This roasting step is crucial for developing those deep, roasted flavors essential to an unforgettable gravy.
Step 4: Deglaze and Simmer
After roasting, pour the white wine into the pan to deglaze, scraping up all those delicious browned bits stuck to the bottom. Those bits are packed with flavor! Then, add the chicken broth and pop everything back into the oven for another 30 to 45 minutes, allowing the liquid to reduce by half—concentrating the flavors and creating a rich stock base.
Step 5: Strain the Goodness
Remove the turkey wings from the pan and save them for another purpose, as this recipe focuses on the gravy. Pour the remaining liquid and vegetables into a strainer set over a large bowl or fat separator to remove any solids and fat, ensuring a silky smooth gravy.
Step 6: Create the Roux
In a heavy-bottomed saucepan, melt the butter over medium heat. Stir in the flour and whisk constantly, cooking for about 2 minutes until the mixture takes on a golden brown hue. This roux is the thickening magic that makes your gravy silky and luscious.
Step 7: Combine and Cook
Gradually pour in the strained broth, whisking nonstop to prevent lumps from forming. Let the gravy gently simmer for 30 minutes, giving it time to thicken beautifully while allowing all those complex flavors to meld into one harmonious sauce. Season finally with salt and pepper to taste—this step ensures your gravy is perfectly balanced.
Step 8: Cool and Store
Once thickened and seasoned just right, allow the gravy to cool completely. Transfer it into an airtight container where it can wait patiently until you’re ready to reheat and serve. This is the true beauty of the Make-Ahead Turkey Gravy Recipe—saving you valuable time on the big day.
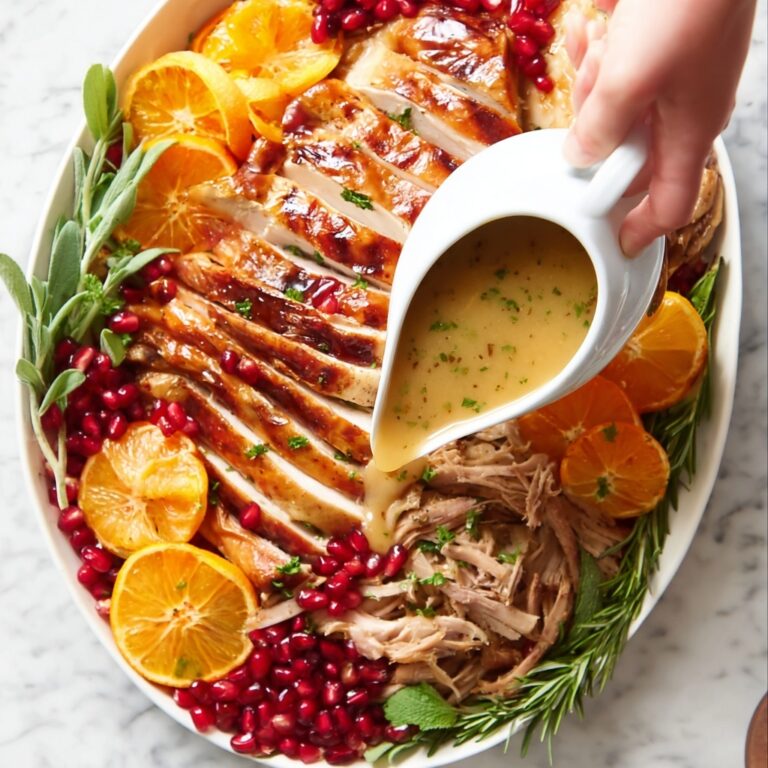
How to Serve Make-Ahead Turkey Gravy Recipe
Garnishes
Adding fresh garnishes can bring your turkey gravy to life. Sprinkle freshly chopped parsley or thyme leaves on top just before serving for a punch of color and a slight herbal lift that complements the rich, roasted sauce.
Side Dishes
This gravy truly shines when paired with classic holiday comforts like buttery mashed potatoes, roasted vegetables, or stuffing. Drizzle generously over slices of warm turkey for that comforting bite everyone dreams of at the dinner table.
Creative Ways to Present
For a fun twist, serve the gravy in a warmed gravy boat or even individual mini saucepans to keep it cozy. You can also set up a gravy station where guests can personalize their plates, making the experience interactive and memorable.
Make Ahead and Storage
Storing Leftovers
The Make-Ahead Turkey Gravy Recipe keeps beautifully in the refrigerator for up to three days. Store it in an airtight container to maintain freshness and lock in all those incredible flavors.
Freezing
If you want to save your gravy a little longer, freezing is a great option. Pour the cooled gravy into freezer-safe containers or heavy-duty freezer bags and freeze for up to three months. When thawed, it tastes just as sumptuous as fresh.
Reheating
Reheat gently over low heat on the stove, stirring often to prevent sticking or burning. If the gravy has thickened too much in the fridge or freezer, add a splash of chicken broth to thin it out while warming. This ensures your gravy returns to that perfect, pourable consistency.
FAQs
Can I use turkey drippings instead of turkey wings?
While turkey drippings can add some flavor, the turkey wings provide a much richer, more robust base for the broth in the Make-Ahead Turkey Gravy Recipe. Using wings ensures a deeper savory profile and better body for your gravy.
Is it possible to make this gravy vegetarian?
This particular recipe relies on turkey wings and chicken broth for its signature flavor. To make a vegetarian version, you’d want to substitute with vegetable broth and use mushrooms or other umami-rich veggies for depth, though it will be quite different in taste.
How far in advance can I prepare this gravy?
You can make this gravy up to three days before your meal when stored properly in the refrigerator. It’s a fantastic way to take some stress off the day of your feast.
Can I thicken the gravy without flour?
Flour is the traditional thickener here, but you could use cornstarch as a gluten-free alternative. Mix it with a little cold water to create a slurry and add it gradually toward the end of cooking until you reach the desired thickness.
What’s the best way to reheat without losing flavor?
Slow and gentle reheating on the stovetop, with occasional whisking and an added splash of broth if needed, preserves the smooth texture and vibrant flavor you worked so hard to build.
Final Thoughts
Embracing this Make-Ahead Turkey Gravy Recipe means you get to enjoy all the glorious flavors of a homemade gravy without the last-minute rush. It’s hearty, comforting, and packed with that roasted richness that only real turkey wings and fresh herbs can deliver. I’m confident this recipe will become a beloved staple in your holiday routine—give it a try and watch it shine on your table!
Print
Make-Ahead Turkey Gravy Recipe
- Prep Time: 10 minutes
- Cook Time: 150 minutes
- Total Time: 2 hours 40 minutes
- Yield: 8 servings
- Category: Sauce/Gravy
- Method: Roasting
- Cuisine: American
- Diet: Halal
Description
This Make-Ahead Turkey Gravy recipe yields a rich and flavorful gravy made from roasted turkey wings and aromatic vegetables. Perfect for holiday dinners or any time you want a savory sauce, this gravy can be prepared in advance and reheated as needed, offering a delicious complement to your turkey or mashed potatoes.
Ingredients
Roasting Ingredients
- ⅓ cup olive oil (divided)
- 3 onions, quartered
- 6 stalks celery, chopped in 2-inch chunks
- 4–5 carrots, chopped in 2-inch chunks
- 1 bunch fresh thyme
- 2 pounds turkey wings
- Salt and pepper, to taste
Deglazing and Broth
- ¾ cup white wine
- 8 cups chicken broth
Gravy Thickening Ingredients
- 8 tablespoons butter
- ½ cup flour
Instructions
- Preheat the oven: Set your oven to 400°F (200°C) to get it ready for roasting the turkey wings and vegetables.
- Prepare the roasting pan: Drizzle 2 tablespoons of olive oil at the bottom of a roasting pan. Scatter the quartered onions, chopped celery, carrots, and fresh thyme evenly across the bottom. Place the turkey wings on top and season generously with salt and pepper. Drizzle the remaining olive oil over the wings.
- Roast the turkey wings and vegetables: Place the roasting pan in the oven and roast for 45 minutes to 1 hour, or until the turkey wings are golden brown and vegetables are tender.
- Deglaze the pan: Remove the pan from the oven and pour the white wine into it. Use a spoon or spatula to scrape up all the browned bits stuck to the pan bottom. Add the chicken broth and return the pan to the oven for another 30 to 45 minutes, allowing the liquid to reduce by half.
- Strain the liquid: Remove the turkey wings from the pan and save them for another use. Pour the remaining mixture of liquid and roasted vegetables through a strainer into a large bowl or a fat separator to remove solids and excess fat.
- Make the roux: In a heavy-bottomed pan over medium heat, melt the butter. Add the flour and whisk constantly, cooking for about 2 minutes until the mixture turns golden brown, which will add a deep flavor to your gravy.
- Combine and thicken: Gradually add the strained broth from the bowl to the roux, whisking continuously to prevent lumps. Cook for about 30 minutes, stirring frequently, until the gravy thickens to your desired consistency. Season with salt and pepper to taste.
- Cool and store: Allow the gravy to cool completely before transferring it to an airtight container. Store in the refrigerator until ready to use. Reheat gently before serving.
Notes
- This gravy can be made ahead of time and stored in the refrigerator for up to 3 days or frozen for longer storage.
- Use turkey wings from your turkey roast or buy separately for an economical option.
- For a gluten-free version, substitute the all-purpose flour with a gluten-free flour blend or cornstarch.
- If you prefer a smoother gravy, you can strain the liquid twice or use an immersion blender to puree the vegetables before adding the roux.
- Adjust the seasoning at the end to suit your taste preferences.


